Using the State Manager
In this tutorial, we will dig into the distributed state management system proposed by soundworks. After a short introduction on the underlying concepts, we will see how to use shared states, and how this pattern can help you to implement remote control and monitoring in your applications. Additionally, we will see how the shared states simplify the development of distributed applications by abstracting the network communications and messages routing.
Along the way, we will discover a related library, @ircam/sc-components, to simply create usable (and hopefully elegant) graphical user interfaces.
The final source code of this tutorial can be found here
Relevant documentation
Introduction
First of all, let's start with a bit of theory to understand the concepts and general logic behind the soundworks' shared states.
The "Why"
Most of the time, we think of an application as "something" that runs on a computer with which a user can interact in some way. The idea of distributed application extends this definition to applications that run on several computers and where several users can interact at the same time. Or to say it in a more formal way:
« A distributed system is a collection of autonomous computing elements that appears to its users as a single coherent system. » Maarten van Steen, and Andrew S. Tanenbaum. “A Brief Introduction to Distributed Systems.” Computing 98, no. 10, October 2016.
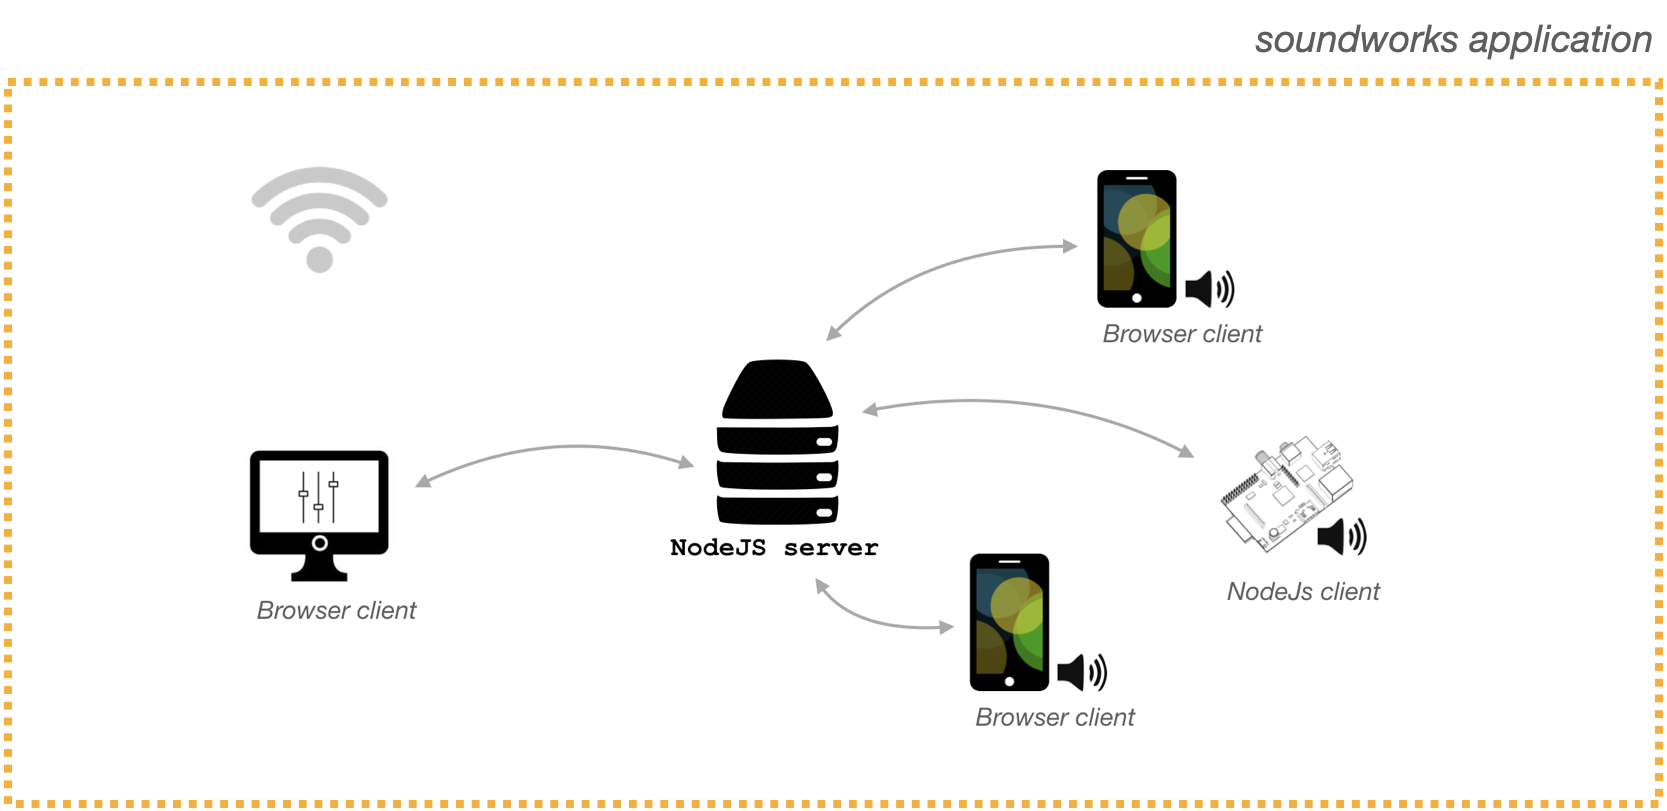
Additionally, in creative contexts, it's important to have very simple ways to monitor and/or control the state of distant clients. This is true both during the development of the artwork / application, e.g. to tweak some synthesizer on distant machines from a central point (even in the studio, modifying some parameters on several machines can get cumbersome quite quickly), as well as during a performance, e.g. to control the general volume, to switch between two sections of the piece, etc.
The StateManager and the SharedState abstractions proposed by soundworks provide a simple way to define and synchronize some sets of parameters that are of interest by multiple clients, while abstracting all the network communications involved.
The "How"
From a more technical point of view, the distributed state management system proposed by soundworks is a circular data flow pattern adapted to the particular needs of real-time distributed applications.
To that end, the flow data is structured according to a circular path that is always synchronized with the server.
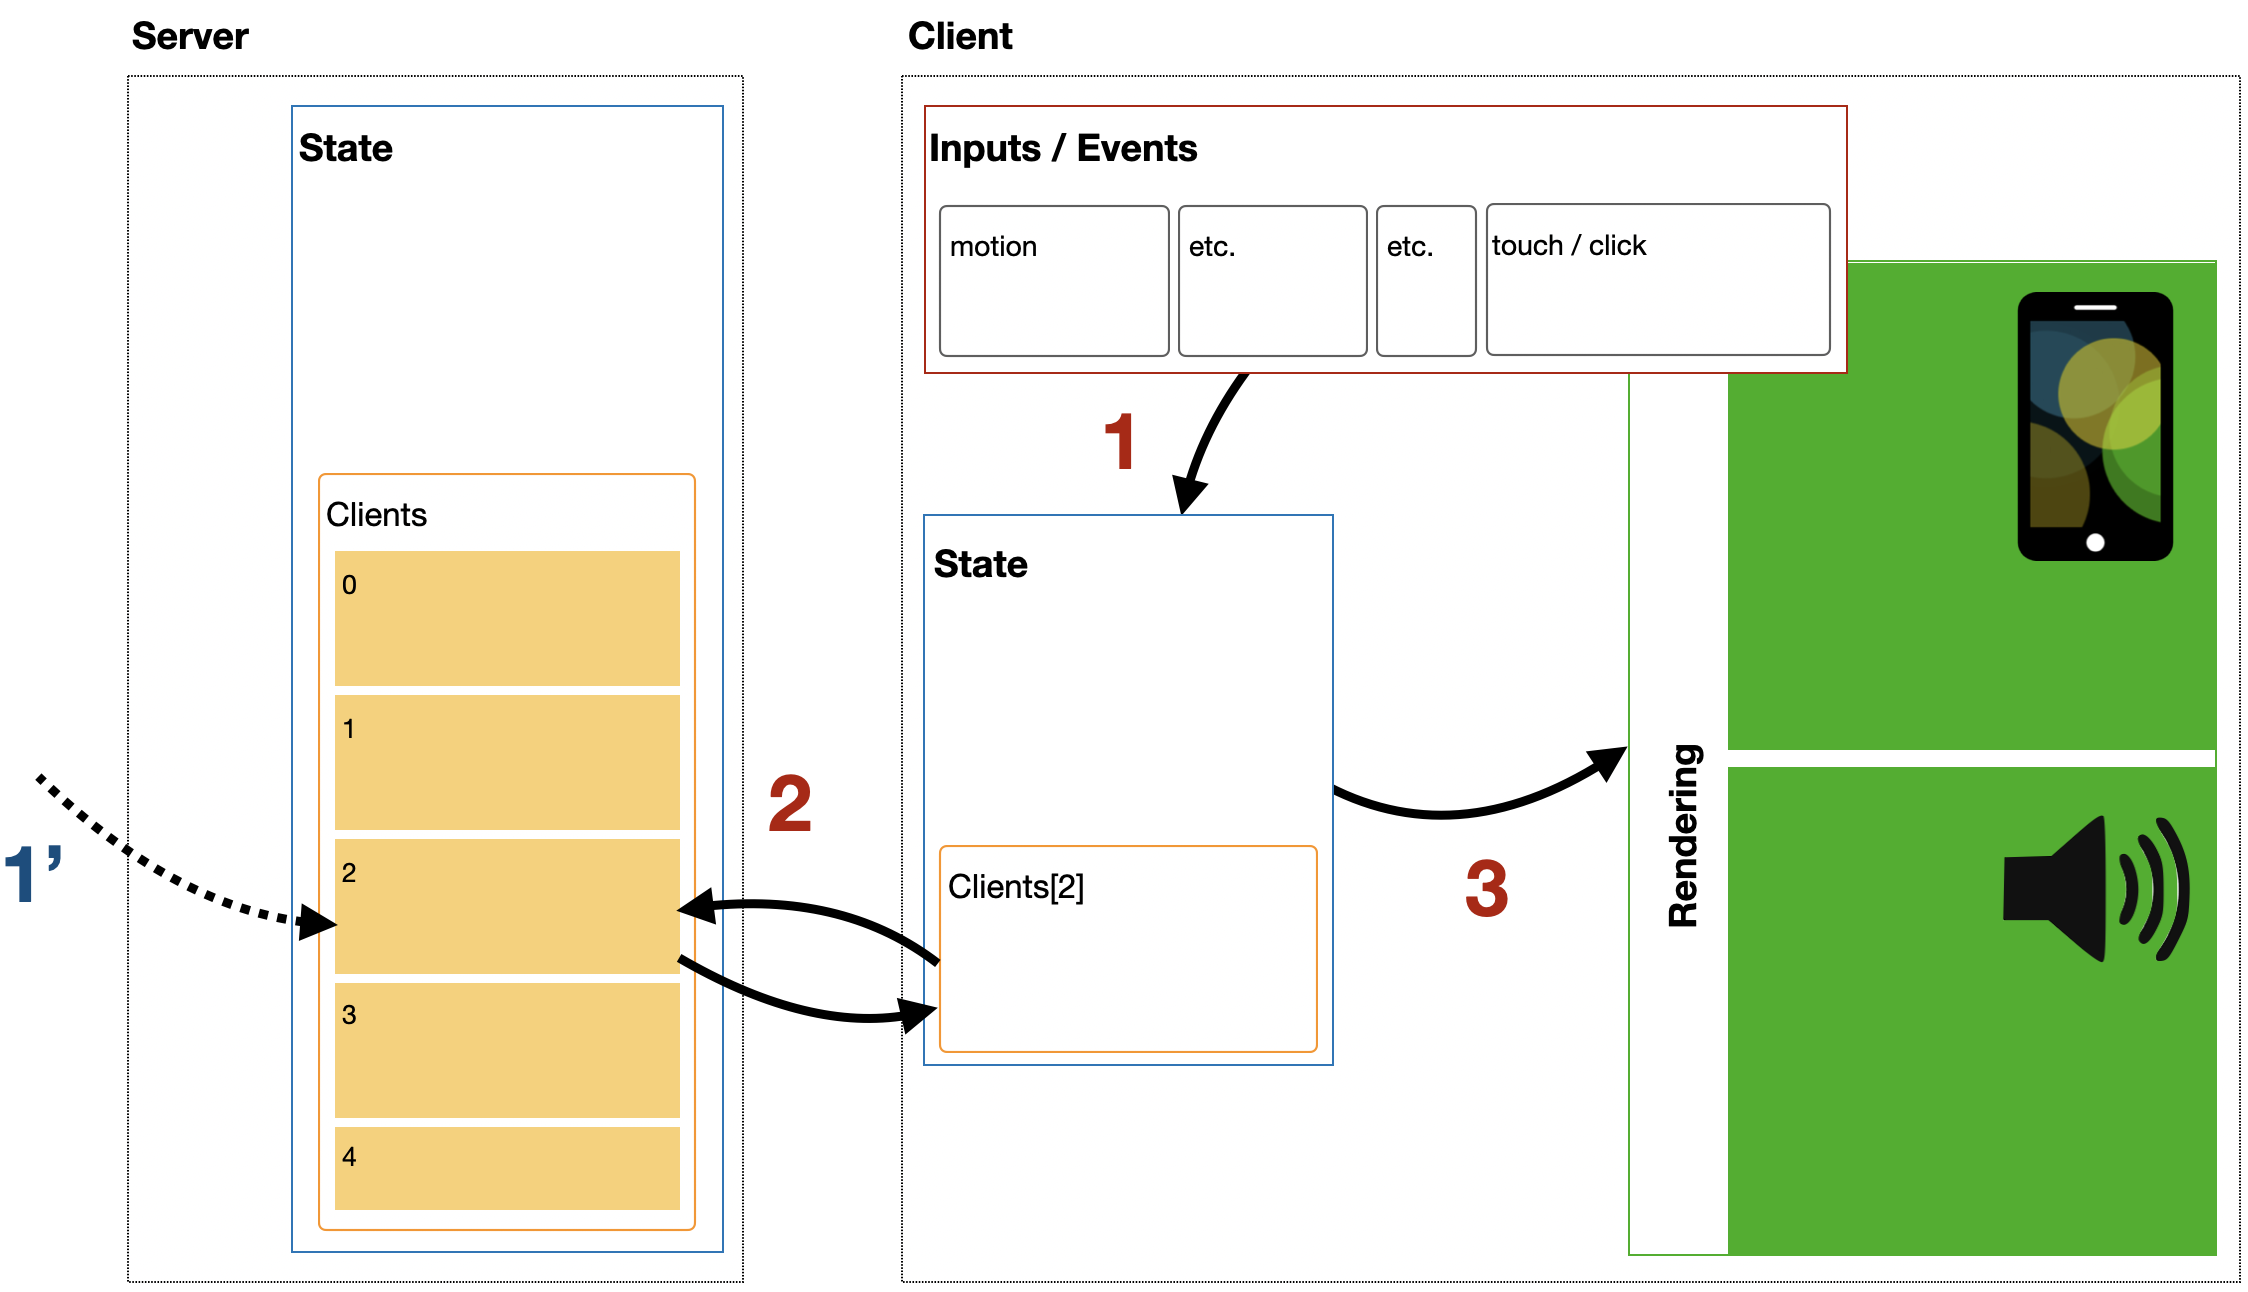
As illustrated in the figure above, when an input (e.g. some user gesture) triggers a change in the state of a client (arrow 1, red), the data is automatically synchronized with a server-side representation of the state through WebSockets (arrow 2), which once done triggers the change in the rendering, be it audio or visual (arrow 3).
This simple pattern enables an important feature: any other node of the network can make a change on the same server-side representation of the state (arrow 1', blue), which will trigger 2 (red) and 3 (red) in a completely transparent way.
INFO
In these tutorials, when we speak of a node of the network, we consider both the clients and the server.
Form the point of view of the distributed state management system, the server is indeed a node just as any client. However, its central role gives it particular abilities and features.
Scaffolding the application
INFO
This section requires basic knowledge of the soundworks wizard, so please refer to the getting started tutorial if you didn't check it yet.
First thing first, let's generate a new empty application with the @soundworks/create wizard.
cd /path/to/working/directory
npx @soundworks/create@latest state-manager
When the wizard asks you for the configuration of the default client:
- Name it
player - Select the
browsertarget - Select the
defaulttemplate
~/tmp $ npx @soundworks/create@latest state-manager
[@soundworks/create#v5.0.3]

> welcome to soundworks

- documentation: https://soundworks.dev
- issues: https://github.com/collective-soundworks/soundworks/issues

- Scaffolding application in "~/tmp/state-manager" directory
- Installing dependencies

[@soundworks/wizard#v5.0.3]

# Install plugins
✔ Select the plugins you would like to install/uninstall ›
+ nothing to do, aborting...

# Install libraries
✔ Select the libraries you would like to install/uninstall ›
+ nothing to do, aborting...

# Create client
✔ Name of your new client (lowercase, no-space): … player
✔ Which runtime for your client? › browser
✔ Which template would you like to use? › default

- Creating client "player" in file "src/clients/player.js"
- name: player
- runtime: browser
- template: default
- default: true

? Confirm? › no / yes
Then open the new state-manager directory in your favorite editor and launch the application in development mode:
cd state-manager
npm run dev
Describing shared state classes
The StateManager component is configured with JavaScript objects that declare a set of attributes and their properties, called SharedStateClassDescription. You can think of a SharedStateClassDescription as a kind of blueprint from which multiple SharedState instances can be created.
TIP
If you are familiar with databases, you can think of SharedStateClassDescription has similar to the schema of a database table.
The syntax for declaring SharedStateClassDescription is documented here.
In this application we will declare two different SharedStateClassDescription:
- A description called
globalwhich we will use to store information accessible by all nodes of the network. This shared state will be unique across the whole application, i.e. it will be created by the server and allplayerclients will "attach" to it. - A description called
player, which we will use to describe the state of a single client of the application. All clients with theplayerrole will create their ownSharedStateinstance from this class.
Let's then create the file src/state-descriptions/global.js, and push the following code into it:
// src/state-descriptions/global.js
export default {
  // volume volume in dB [-60, 6]
  volume: {
    type: 'float',
    min: -60,
    max: 6,
    default: 0,
  },
  // mute [true, false]
  mute: {
    type: 'boolean',
    default: false,
  },
};
TIP
Note that the state-descriptions directory you just created is just proposal to keep the code organized and is in anyway mandatory, i.e. such declarations could potentially live anywhere in your code...
Just keep in mind that this is your responsibility as a developer to keep things organized and to properly name them in way that minimize your cognitive load.
From this simple code we can see that this description, and its derived SharedState instance, will allow us to control the volume of all clients as well as to mute/unmute them.
Second, let's create the file src/state-descriptions/player.js containing the following code:
// src/state-descriptions/player.js
export default {
  frequency: {
    type: 'float',
    min: 50,
    max: 1000,
    default: 440,
  },
};
This description, that we will use to create a new SharedState on each client, will allow us to control the frequency of an oscillator.
Interestingly, we can already foresee from these two definitions, the structure of the audio graph that we will create on each client:
[OscillatorNode] -> [GainNode (mute)] -> [GainNode (volume)] -> [output]
- The
OscillatorNodewill be controlled by the differentSharedStates created from description declared in theplayer.jsfile, i.e. each client will be able to have a different oscillator frequency. - At contrary, the
GainNodes (mute and volume) will be controlled globally for all clients by the commonSharedStatecreated from description declared in theglobal.jsfile,.
INFO
To keep things focused on the distributed state management system, we won't actually create the audio graph in this tutorial, but this could be an interesting exercise to do on your own!
Defining shared state classes
Let's first import the declarations into the src/server.js file:
// src/server.js
import { Server } from '@soundworks/core/server.js';
import { loadConfig, configureHttpRouter } from '@soundworks/helpers/server.js';

import globalDescription from './state-descriptions/global.js';
import playerDescription from './state-descriptions/player.js';
Once done, we can define classes of SharedStates from these SharedStateClassDescription using the stateManager instance of the soundworks server:
// src/server.js
const server = new Server(config);
configureHttpRouter(server);

// define the shared state classes from our descriptions
server.stateManager.defineClass('global', globalDescription);
server.stateManager.defineClass('player', playerDescription);
Note that the stateManager.defineClass method takes 2 arguments:
- A
SharedStateClassName: a user defined string that acts as a sort of identifier for this class of shared states, here'global'and'player'. - A
SharedStateClassDescription: theglobalDescriptionandplayerDescriptionwe defined in their own files and explained above.
TIP
While this signature allows to declare simple user-friendly names for creating and attaching shared state, it also allows to register the same schema under different names in more advanced use cases.
Now that our SharedState classes are defined within the server.stateManager, we can safely create new instances of SharedStates based on these names and descriptions.
Creating shared states
Let's first create our global shared state instance from the class we just defined.
As explained above, we want this shared state to be unique across the entire application so that all clients share the same values. This can be simply achieved by:
- creating the state on the server-side, i.e. the server is thus the owner of the state.
- attaching all our clients to this state, i.e. they have full access to the shared state values and can even update them but they do not own the state, which means that the state won't be deleted when they disconnect.
While this distinction between create and attach can be a bit confusing at first, this will get more clear writing the code.
Let's thus add following lines into the src/server.js to create our global shared state instance, using the same SharedStateClassName we used when we defined the class:
// src/server.js
await server.start();

const global = await server.stateManager.create('global');
console.log(global.getValues());
In your Terminal window, you should now see the default values of the state logged:
+ http server listening on
    http://127.0.0.1:8000

> press "Ctrl + C" to exit
{ volume: 0, mute: false }
Let 's now attach all our player clients to the global state created by the server.
To that end, open the file src/clients/player.js and add the following lines of code:
// src/clients/player.js
await client.start();

const global = await client.stateManager.attach('global');
console.log(global.getValues());
Note that, instead of the method stateManager.create used on the server side, we use its counterpart stateManager.attach on the client side. Hence only one instance of the state exists on the network (it is owned by the server which created it), but all nodes of the network have access to the different values of the shared state.
If you open the URL http://127.0.0.1:8000 in your browser of choice and open the JavaScript console, you should see the current values of the global state displayed in the console just as for the server:

TIP
To open the JavaScript console in your browser, you can press Cmd + Alt + I and then select the Console tab.
While we are on the client-side code of our "player" clients, let's create the player shared state for each of them. To that end, add the following line of code in the src/clients/player.js file:
// src/clients/player.js
await client.start();

const global = await client.stateManager.attach('global');
const player = await client.stateManager.create('player');
Here, you can see side-by-side the stateManager.create and stateManager.attach methods and how they relate:
stateManager.createcreates a new instance of a shared state that is owned by the node (either client or server).stateManager.attachattach to an existing shared state instance created and owned by another node.
Display the states values
Now that our shared states are setup, let's continue on our client-side code to display the current values of the different shared states and update the screen when their values change.
INFO
In these series, all HTML rendering will be achieved by using the Lit library proposed by Google and the @ircam/sc-components library. Both libraries are installed by default when you create a new application using the soundworks wizard.
Let's first modify the renderApp provided by the "player" boilerplate code to display the values of our two states:
// src/clients/player.js
await client.start();

const global = await client.stateManager.attach('global');
const player = await client.stateManager.create('player');

function renderApp() {
  render(html`
    <div class="simple-layout">
      <p>Hello ${client.config.app.name}!</p> // [!code --]
      <h2>Global</h2> // [!code ++]
      <ul> // [!code ++]
        <li>volume: ${global.get('volume')}</li> // [!code ++]
        <li>mute: ${global.get('mute')}</li> // [!code ++]
      </ul> // [!code ++]
      <h2>Player</h2> // [!code ++]
      <ul> // [!code ++]
        <li>frequency: ${player.get('frequency')}</li> // [!code ++]
      </ul> // [!code ++]

      <sw-credits .infos="${client.config.app}"></sw-credits>
    </div>
  `, $container);
}

renderApp();
If you refresh your web page (Cmd + Shift + R), you should now see the following:
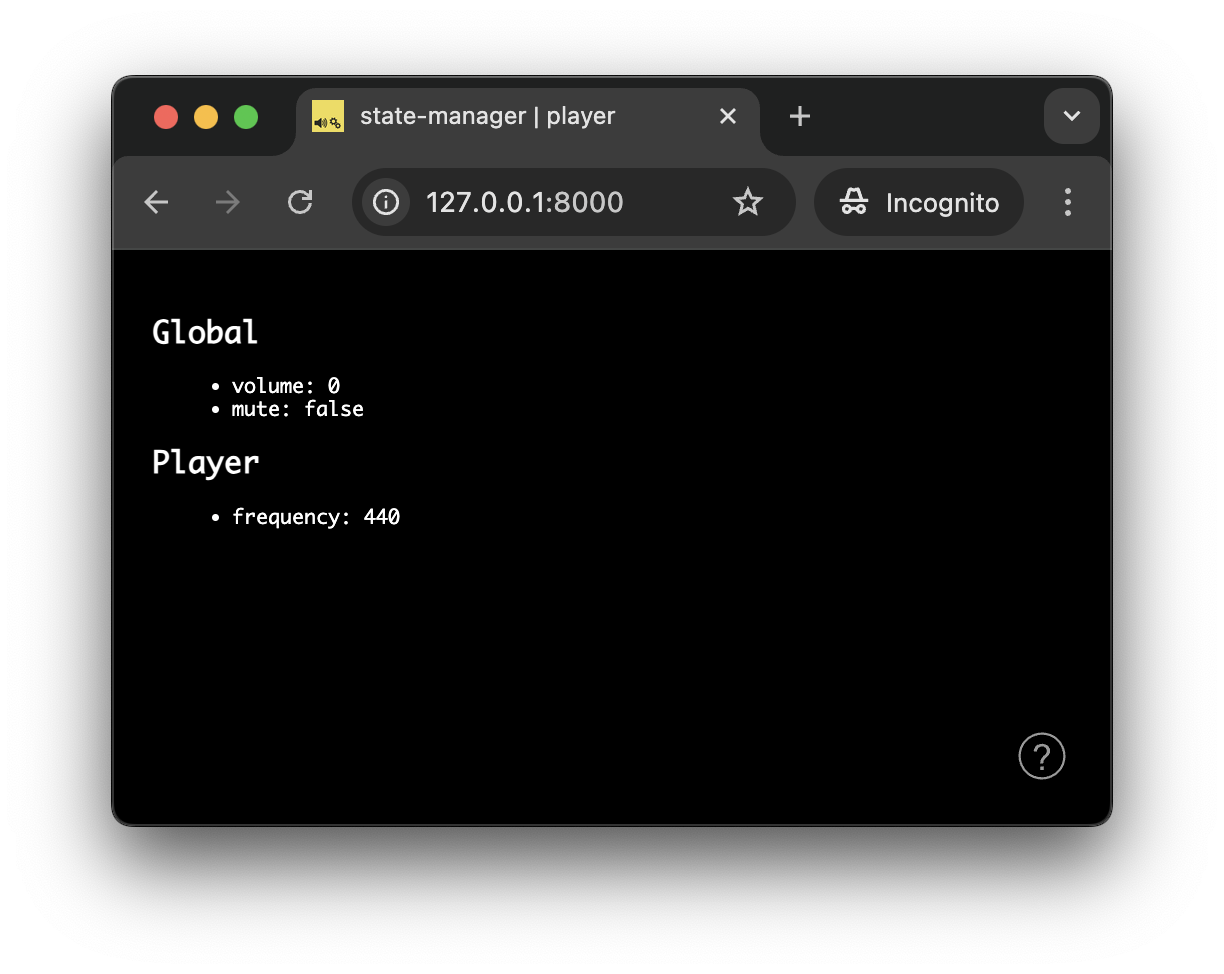
So far so good, we have all our states set up and some display of their values.
INFO
In this tutorial the rendering will be only graphical and we won't go into the audio details to keep things focused on the shared states. Just keep in mind that the general idea and logic would be exactly the same with some audio rendering instead of graphics.
However, what we miss now is a way to change the values of the states. While we could implement it directly in our player clients, we will go a bit deeper with the StateManager and create a new "controller" client dedicated to this task.
Remote control and monitoring
In this section we will implement a second client with a specific role dedicated to control and monitor the general state of the application, we will call controller.
Scaffolding the controller client
Let's use the soundworks wizard to configure our new client and to create all the boilerplate code.
Go to the Terminal, shutdown your server (Ctrl + C) and enter the following command:
npx soundworks --create-clientJust as when you created the application at the beginning of the tutorial, the soundworks wizard will ask you some questions to configure the client:
- Name this new client
controller - Select the
browsertarget - But this time select the
controllertemplate
Additionally, the wizard will ask you if you want to use this client as the default one (meaning it will be accessible at the root of your website), choose no and confirm.
~/tmp/state-manager $ npx soundworks --create-client
[@soundworks/wizard#v5.0.3]

# Create client
✔ Name of your new client (lowercase, no-space): … controller
✔ Which runtime for your client? › browser
✔ Which template would you like to use? › controller
✔ Use this client as default? … no / yes

- Creating client "controller" in file "src/clients/controller.js"
- name: controller
- runtime: browser
- template: controller
- default: false

✔ Confirm? … no / yes
+ client controller created and configured
In your editor you can see that new file src/clients/controller.js has been created by the wizard. This is where we will implement the logic for our "controller" client.
Now that everything is set up, we can restart our development server and go back to the implementation of our controller client:
npm run devThe controller client will be accessible via the following URL: http://127.0.0.1:8000/controller
TIP
Note that the /controller part of the URL is automatically created by the default router configuration using to the names of the clients.
Binding the global state
Let's first start with creating the controls for the global shared state. Open the src/clients/controller.js file and add the following code to import all the components provided by the @ircam/sc-components library:
// src/clients/controller.js
import '@soundworks/helpers/polyfills.js';
import { Client } from '@soundworks/core/client.js';
import { loadConfig, launcher } from '@soundworks/helpers/browser.js';
import { html, render } from 'lit';

import '@ircam/sc-components';
Importing this file will register new HTML elements that we can now use in our HTML templates. For example, a text element to display parameter names, a slider to control the volume, a toggle button to control the mute parameter, and a number box to control the players' frequencies.
INFO
Such HTML components are defined using a Web standard called Web Components. See https://developer.mozilla.org/en-US/docs/Web/Web_Components for more information.
Then, such as for the player, let's first attach to the global state
// src/clients/controller.js
await client.start();
const global = await client.stateManager.attach('global');
Then, let's create an interface that displays the global state current values using the global.get method:
// src/clients/controller.js
await client.start();
const global = await client.stateManager.attach('global');
function renderApp() {
render(html`
<div class="controller-layout">
<header>
<h1>${client.config.app.name} | ${client.role}</h1>
<sw-audit .client="${client}"></sw-audit>
</header>
<section>
<p>Hello ${client.config.app.name}!</p> // [!code --]
<div> // [!code ++]
<h2>Global</h2> // [!code ++]
<div style="padding-bottom: 4px;"> // [!code ++]
<sc-text readonly>volume (dB)</sc-text> // [!code ++]
<sc-slider // [!code ++]
min="-60" // [!code ++]
max="6" // [!code ++]
value=${global.get('volume')}
></sc-slider> // [!code ++]
</div> // [!code ++]
<div style="padding-bottom: 4px;"> // [!code ++]
<sc-text readonly>mute</sc-text> // [!code ++]
<sc-toggle // [!code ++]
?active=${global.get('mute')}
></sc-toggle> // [!code ++]
</div> // [!code ++]
</div> // [!code ++]
</section>
</div>
`, $container);
}
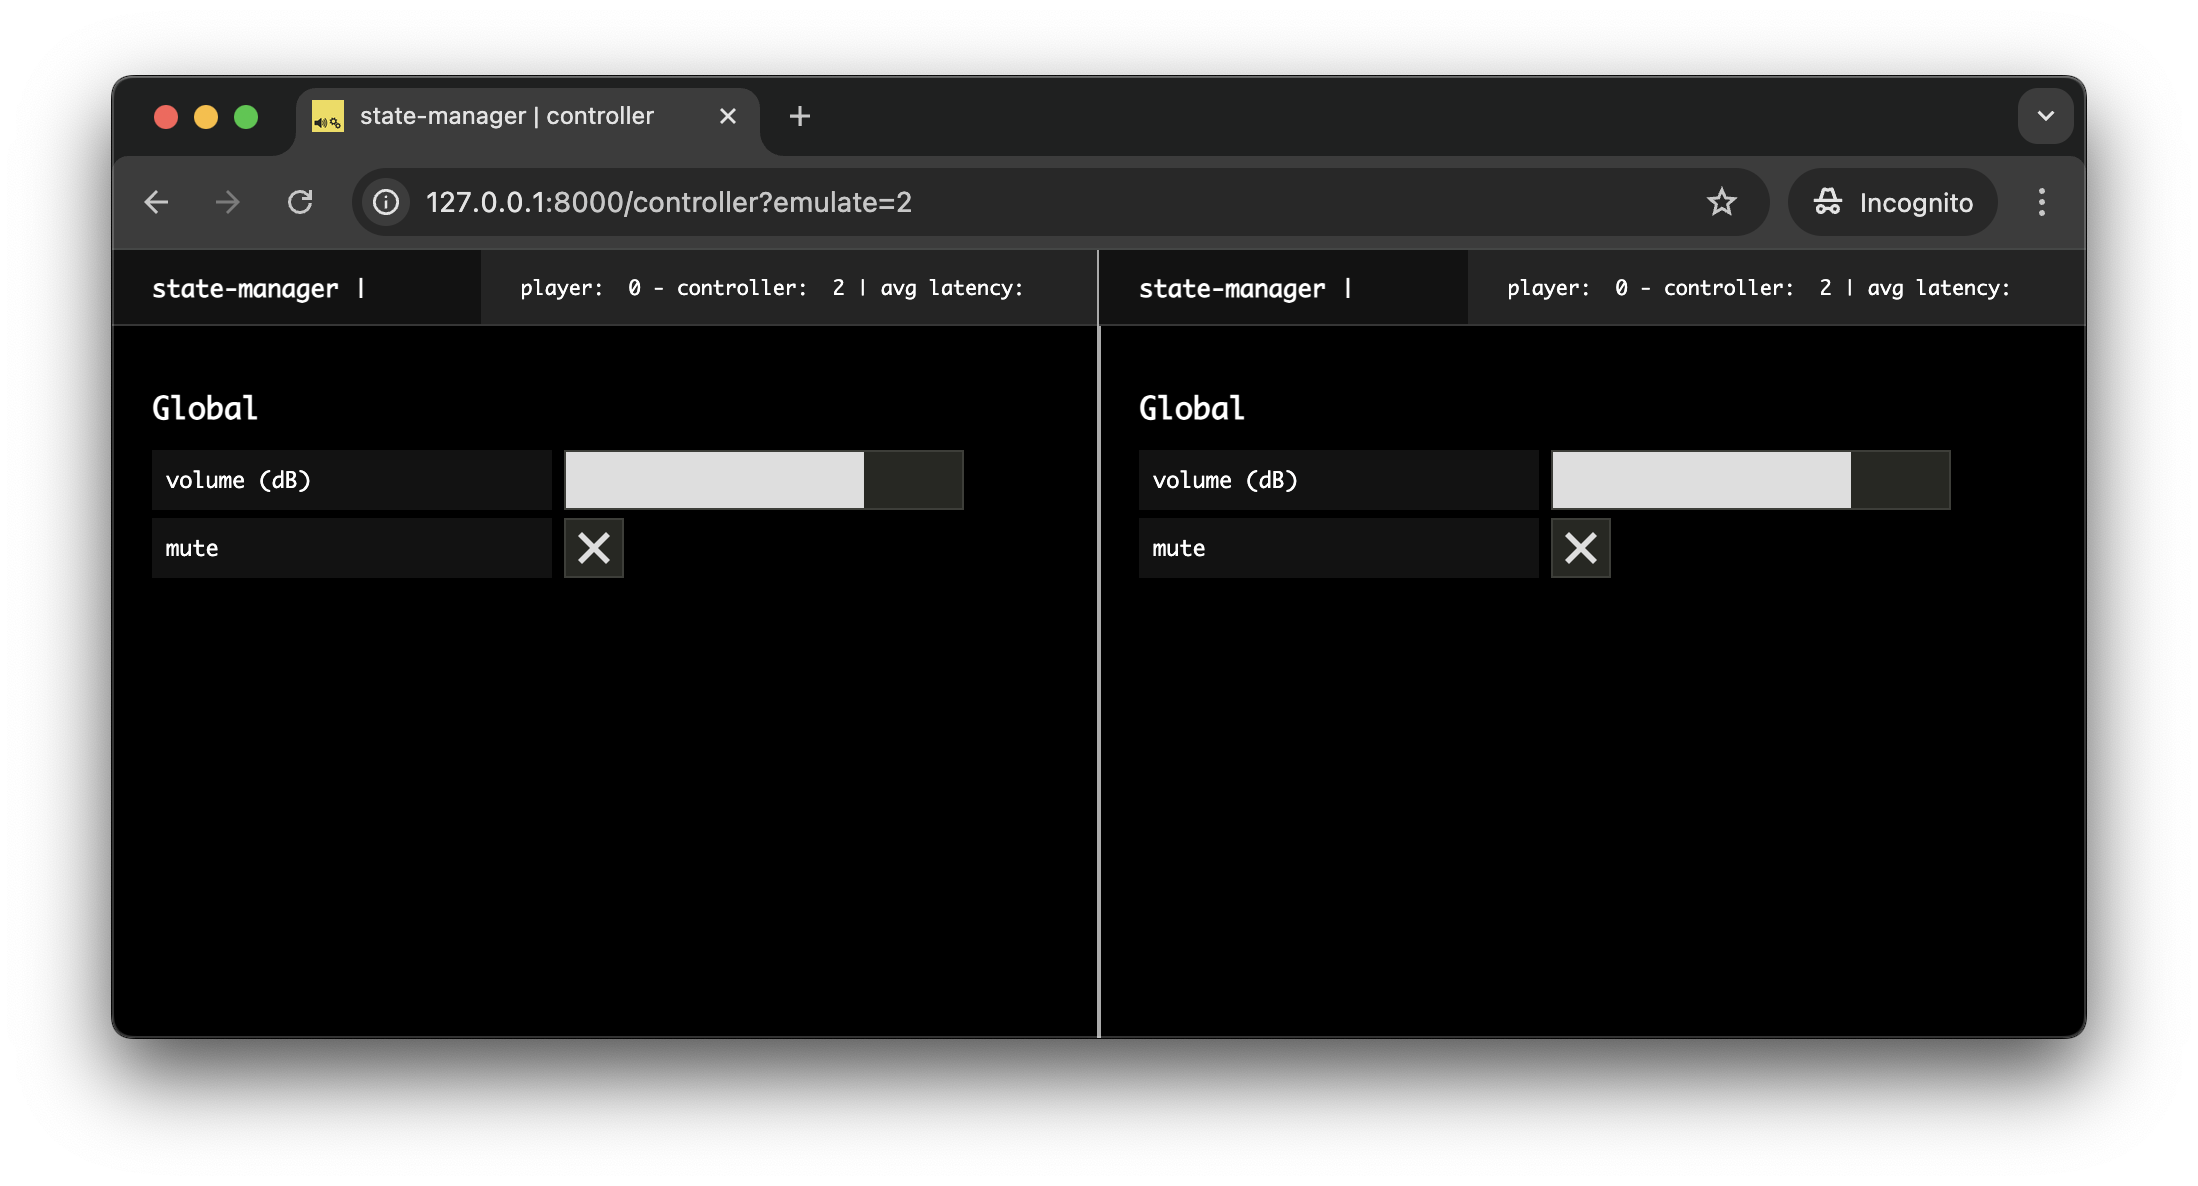
renderApp();If you refresh your controller page, you should now see the following interface displayed with the global shared state default values correctly displayed:
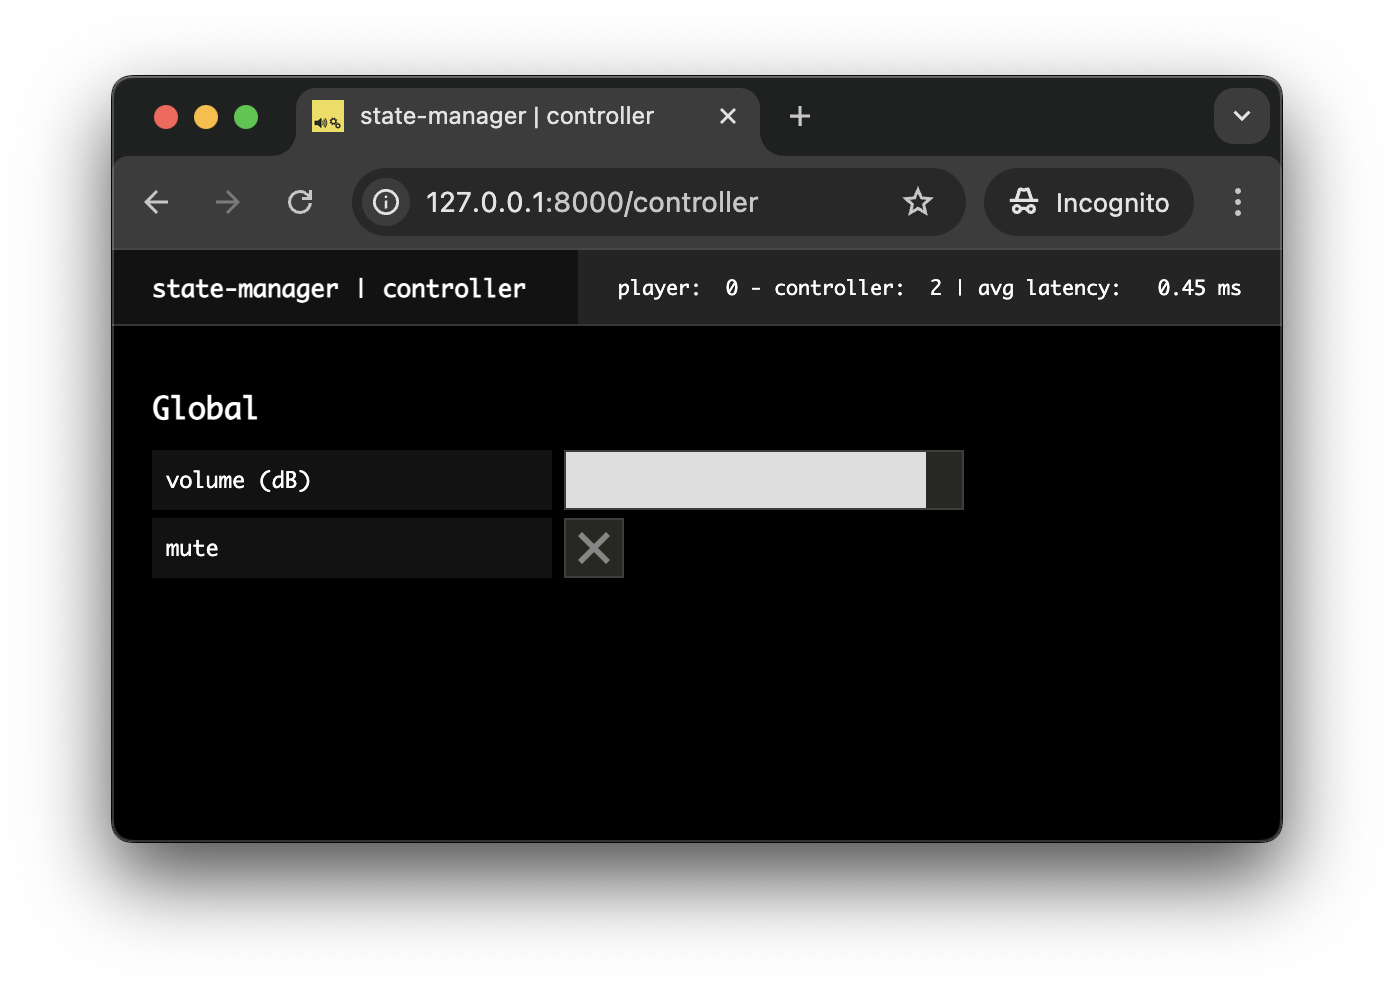
However, the binding between the state and the interface is still missing: interacting the interface (e.g. moving the slider or clicking the toggle) does not yet update the shared state values. To fix that, we simply need to use the global.set method and add the following lines of code to update the state when interacting with the interface:
// src/clients/controller.js
function renderApp() {
    render(html`
      <div class="controller-layout">
        <header>
          <h1>${client.config.app.name} | ${client.role}</h1>
          <sw-audit .client="${client}"></sw-audit>
        </header>
        <section>
          <div>
            <h2>Global</h2>
            <div style="padding-bottom: 4px;">
              <sc-text readonly>volume (dB)</sc-text>
              <sc-slider
                min="-60"
                max="6"
                value=${global.get('volume')}
                @input=${e => global.set('volume', e.detail.value)}
              ></sc-slider>
            </div>
            <div style="padding-bottom: 4px;">
              <sc-text readonly>mute</sc-text>
              <sc-toggle
                ?active=${global.get('mute')}
                @change=${e => global.set('mute', e.detail.value)}
              ></sc-toggle>
            </div>
          </div>
        </section>
      </div>
    `, $container);
  }
Finally, we just need to tell your interface to re-render itself when the global shared state is updated, using the global.onUpdate method:
const global = await client.stateManager.attach('global');
function renderApp() {
// ...
}
// update interface when the shared state values are updated
global.onUpdate(() => renderApp());
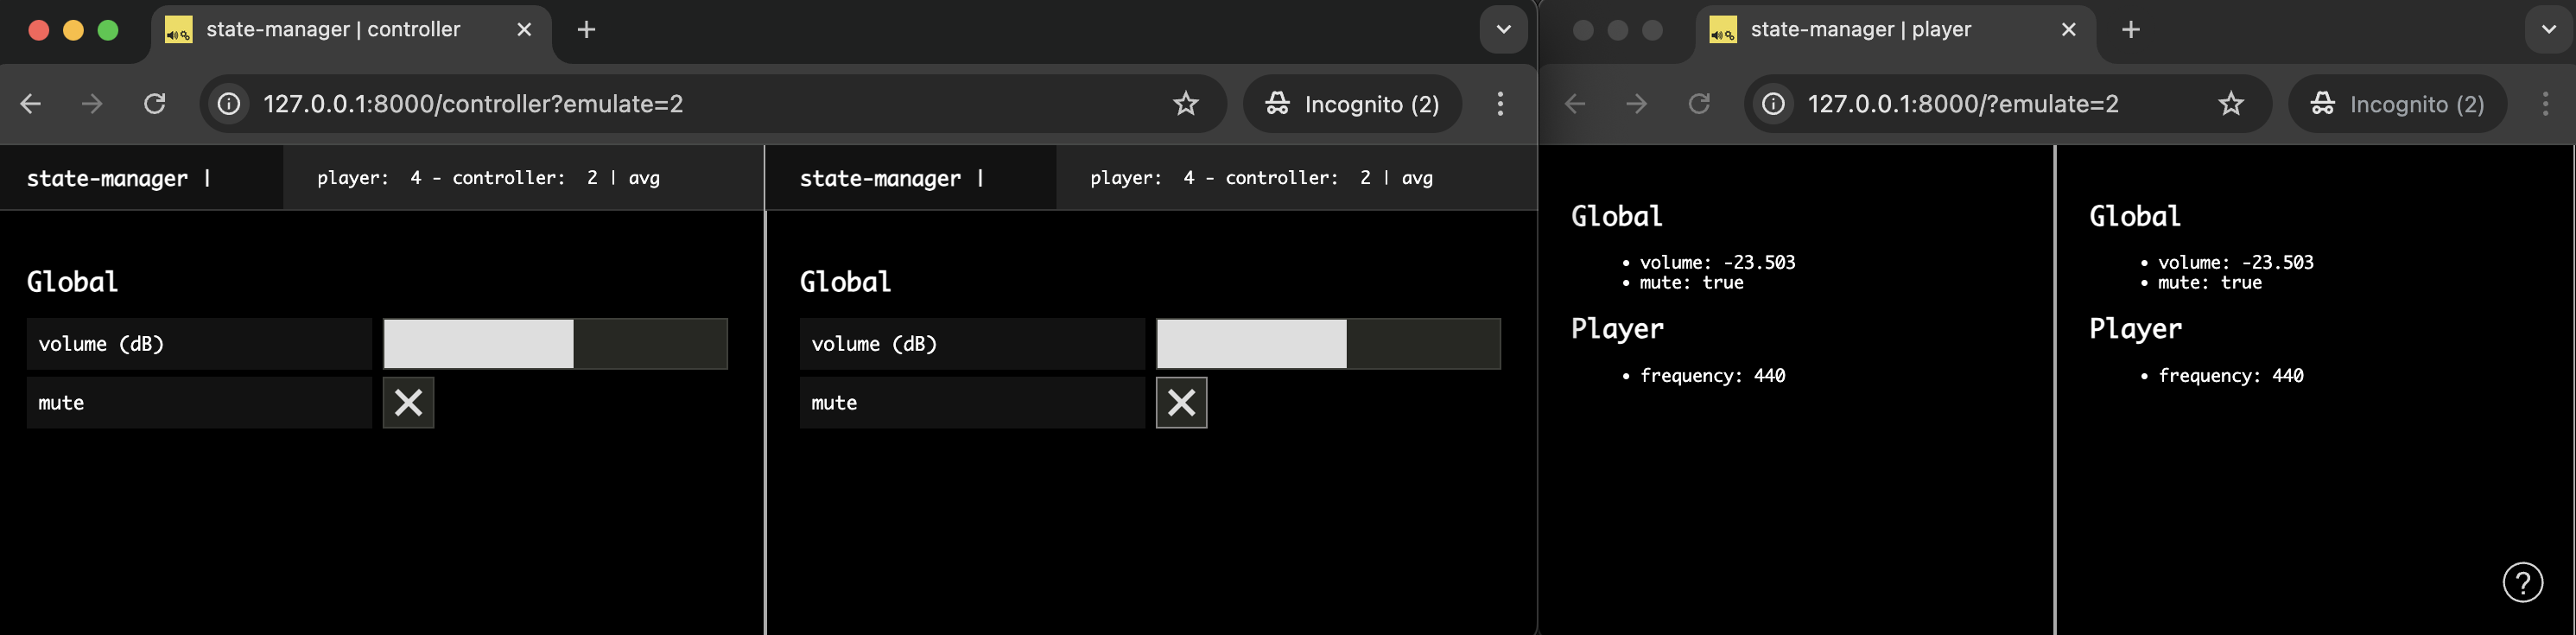
renderApp();Now, if you open http://127.0.0.1:8000/controller?emulate=2 to emulate two controller clients side by side (see the ?emulate=2 at the end of the URL), you should see that both interfaces are fully synchronized through the global shared state.
Now that our "controller" is ready, let's go back to our player clients to implement a similar logic to update the screen when the shared states are updated. So let's re-open the src/clients/player.js file and add the following lines of code:
// src/clients/player.js
await client.start();

const global = await client.stateManager.attach('global');
const player = await client.stateManager.create('player');

function renderApp() {
  // ...
}

global.onUpdate(() => renderApp());
player.onUpdate(() => renderApp());

renderApp();
With these two simple lines of code, all the players interfaces are now automatically updated every time a parameter of a shared state is updated.
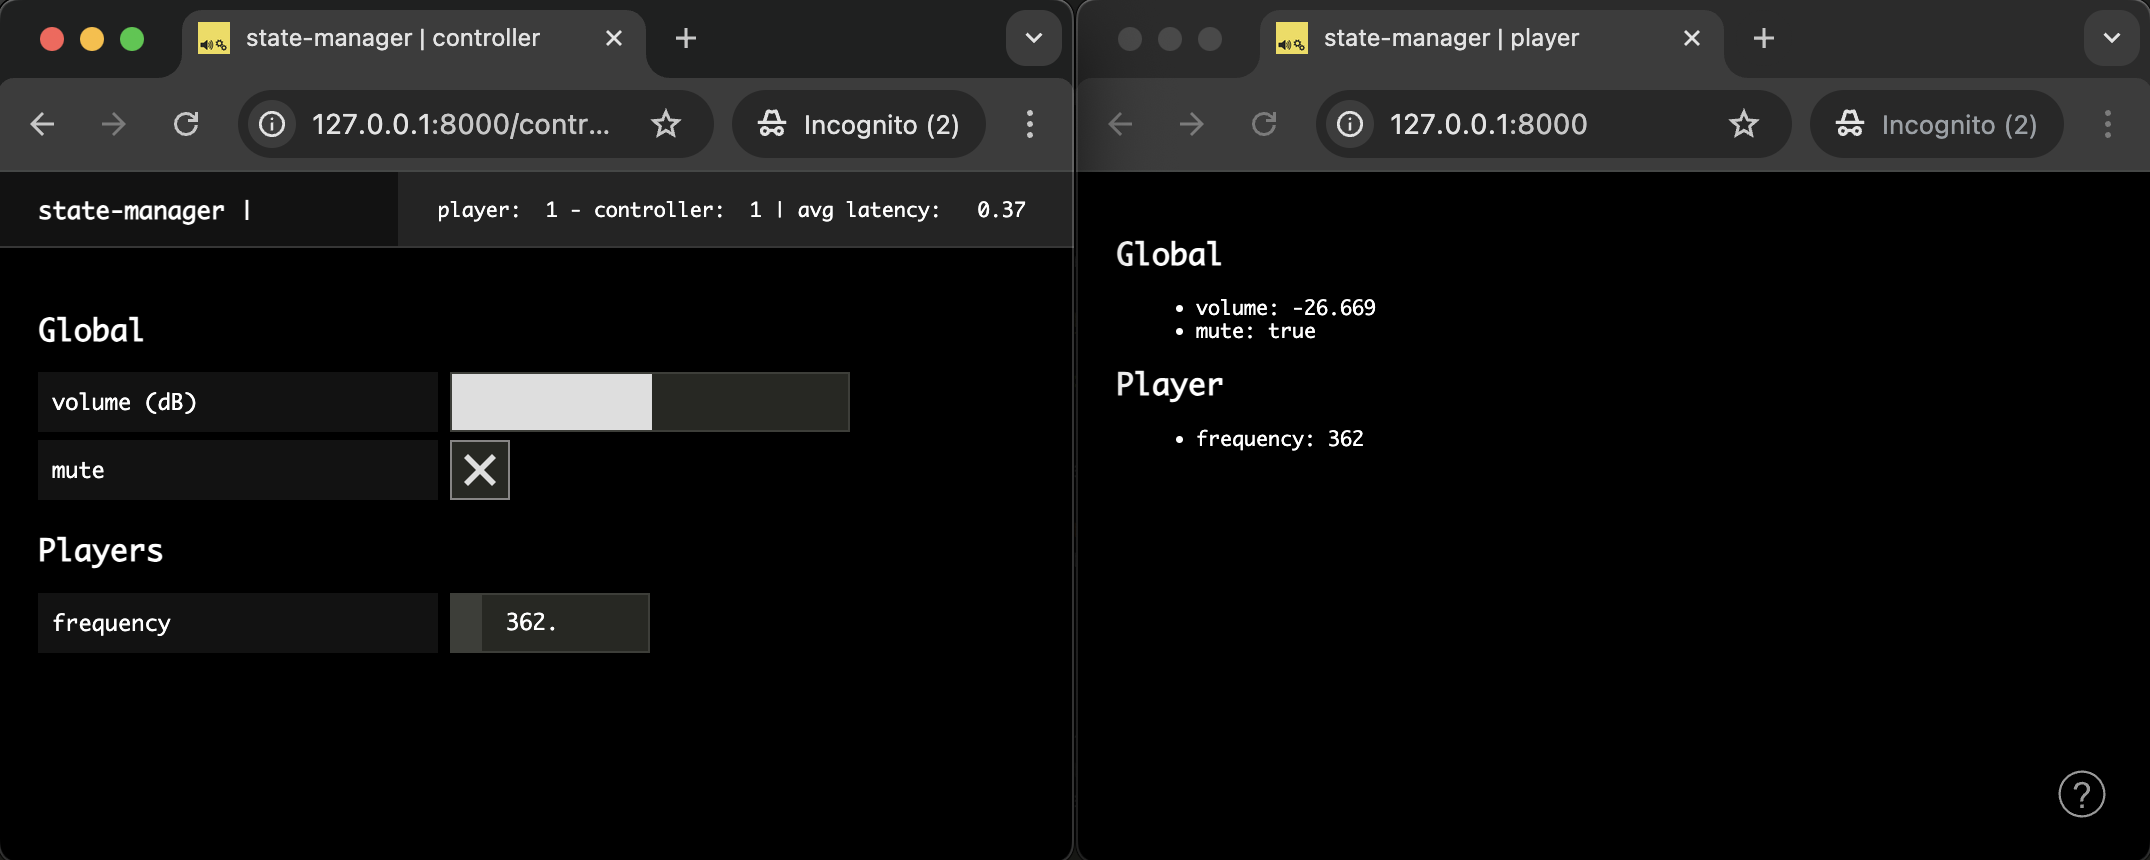
To see this in action, open two browser windows side by side and, launch some controller(s) in one of them http://127.0.0.1:8000/controller?emulate=2 and some players in the other one http://127.0.0.1:8000/?emulate=2. If you manipulate one of the controller you can see that all clients are synced and updated as expected.
Observing and controlling collections of states
The final thing we want to do is to be able to control the frequency of each player individually from our controller interfaces. To that end, the controller needs to be able to track the creation (and deletion) of all player states in the distributed application. Fortunately, the StateManager gives you access to such functionality.
Let's thus create a new SharedStateCollection of players and make sure the interface is updated each time a "player" state is created (i.e. when a client connects to the application), deleted (i.e. when a client disconnects from the application), or when a state is updated:
// src/clients/controller.js
await client.start();
const global = await client.stateManager.attach('global');
// Create a new collection that contains all the player states
const players = await client.stateManager.getCollection('player');
Finally, let's just update our HTML template to display the frequency control for all player shared states:
render(html`
  <header>
    // ...
  </header>
  <section>
    <div>
      <h2>Global</h2>
      // ...
    </div>
    <div> // [!code ++]
      <h2>Players</h2> // [!code ++]
      ${players.map(player => {
        return html` // [!code ++]
          <div> // [!code ++]
            <sc-text>frequency</sc-text> // [!code ++]
            <sc-number // [!code ++]
              min=${player.getDescription('frequency').min}
              max=${player.getDescription('frequency').max}
              value=${player.get('frequency')}
              @input=${e => player.set('frequency', e.detail.value)}
            ></sc-number> // [!code ++]
          </div> // [!code ++]
        `
      })}
    </div> // [!code ++]
  </section>
`, $container);
Now if you open two browser windows and launch a controller http://127.0.0.1:8000/controller and a player http://127.0.0.1:8000/, you will see that you can control the frequency of the player from the controller.
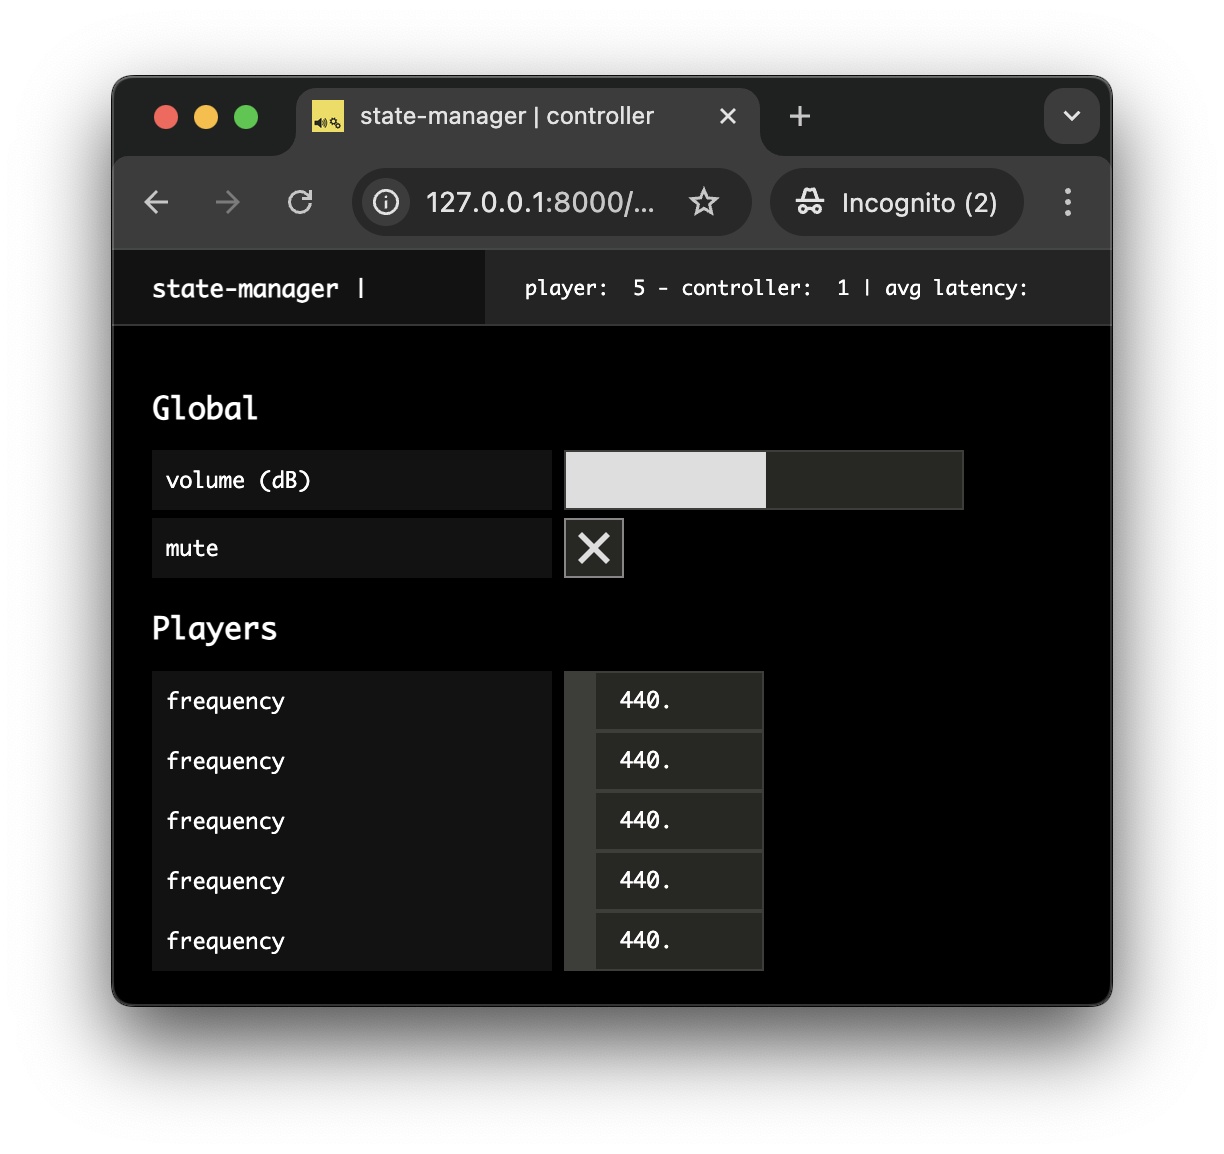
However, there is still an issue with our interface: if we emulate several player clients, e.g. http://127.0.0.1:8000/?emulate=5, we can see that we have no way to know which control corresponds to which player:
Let's review our code a bit to handle this problem.
Using the client id to enhance the control interface
To fix this problem, let's just use the id that is automatically given by soundworks to each client when it connects, to share it within the player state.
So first, let's add a new parameter called id of type integer to our player schema to store this value:
// src/state-descriptions/player.js
export default {
  id: {
    type: 'integer',
    default: 0,
  },
  frequency: {
    type: 'float',
    min: 50,
    max: 1000,
    default: 440,
  },
};
Second, let's review our player client code to:
- pass the client id to the shared state when it is created by the client
// src/clients/player/index.js
const global = await client.stateManager.attach('global');
// create the player state with the client id
const player = await client.stateManager.create('player')
const player = await client.stateManager.create('player', { id: client.id }); - and display the
client.idin the player interface:
// src/clients/player/index.js
function renderApp() {
  render(html`
    <div class="simple-layout">
      <h1>Player ${player.get('id')}</h1> // [!code ++]
      <h2>Global</h2>
      // ...
    </div>
  `, $container);
}
Finally, let's just display this information in the controller interface:
// src/clients/controller/index.js
${players.map(player => {
return html`
<div>
<sc-text>frequency</sc-text> // [!code --]
<sc-text>player ${player.get('id')} - frequency</sc-text> // [!code ++]
<sc-number
min=${player.getDescription('frequency').min}
max=${player.getDescription('frequency').max}
value=${player.get('frequency')}
@input=${e => player.set('frequency', e.detail.value)}
></sc-number>
</div>
`
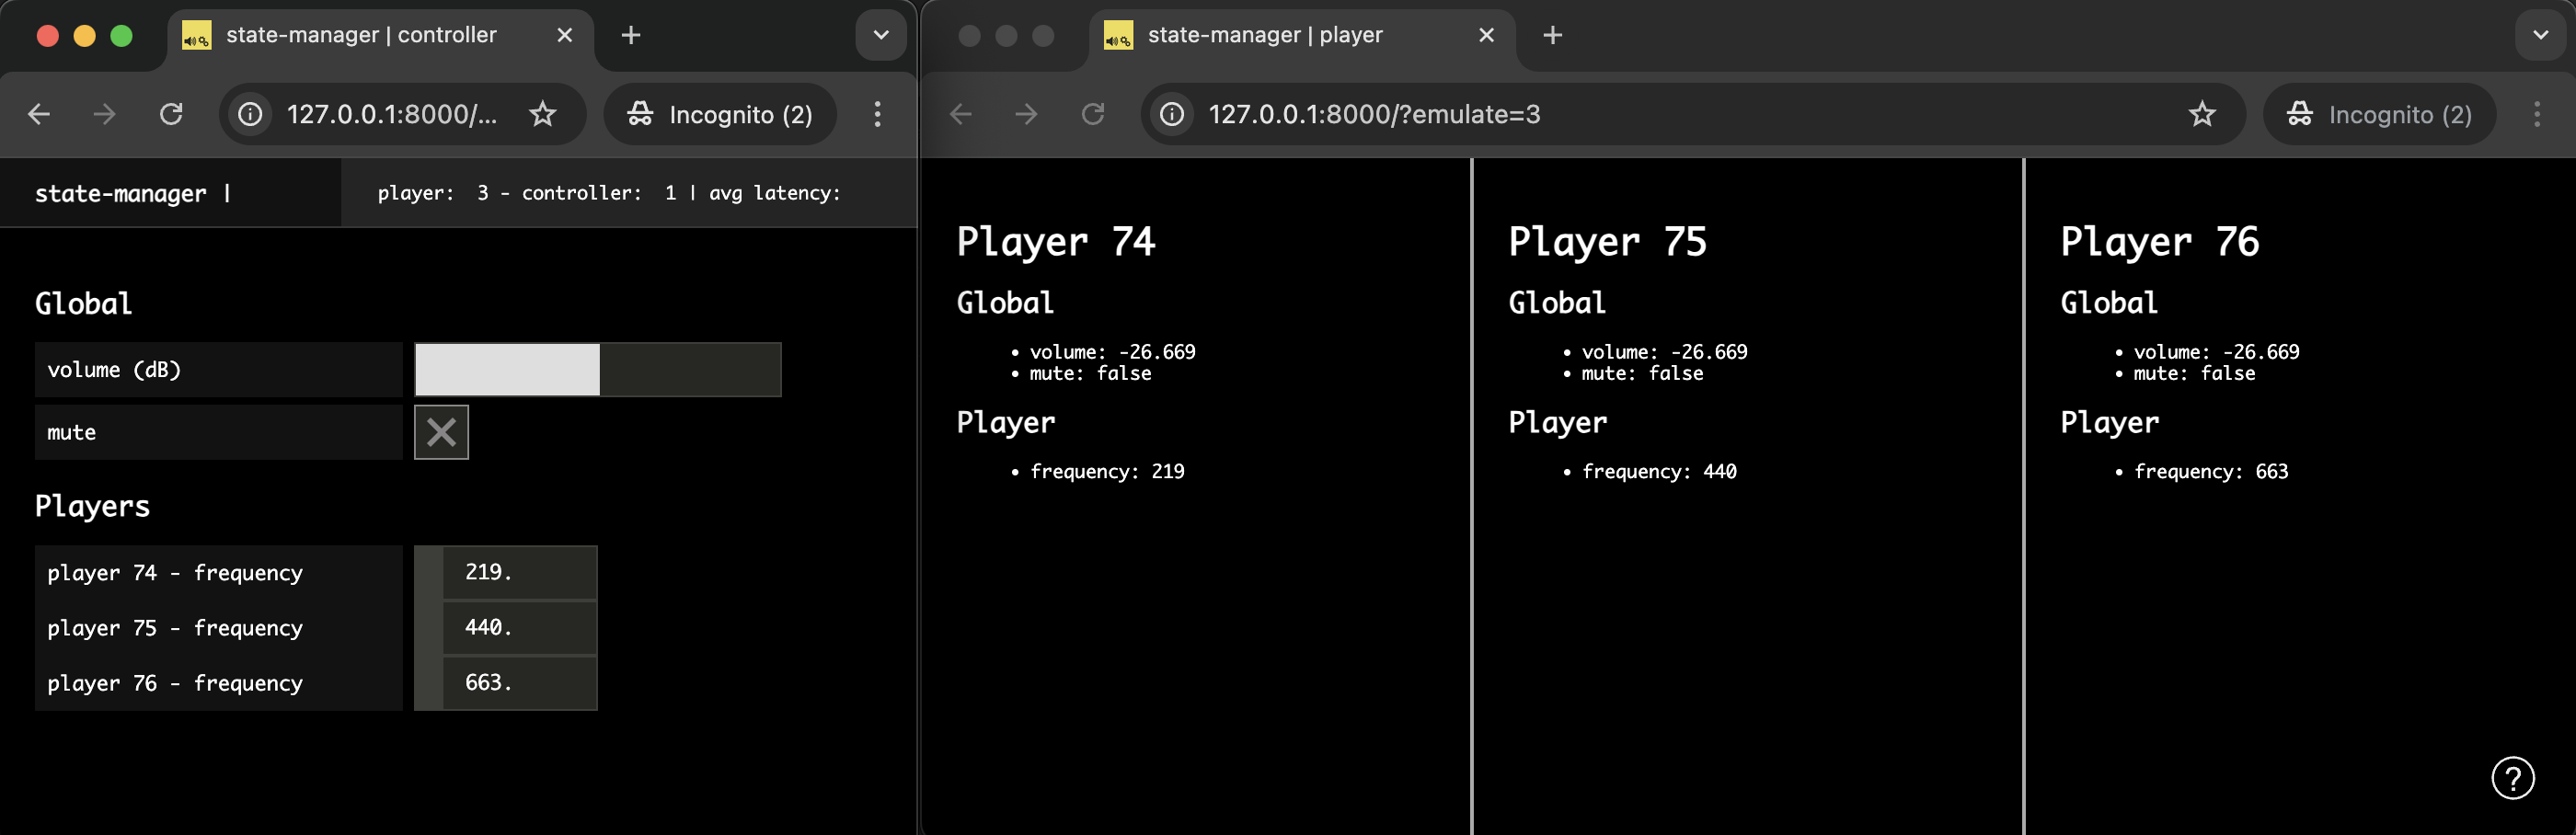
})}Now, if you open a controller (http://127.0.0.1:8000/controller) and several players (http://127.0.0.1:8000/?emulate=3) side by side, you should see a more useful interface:
Conclusion
In this tutorial, you learned how to use the soundworks distributed state management system which we consider one of its most powerful and versatile feature.
You have seen how to create global states that are common to all clients of the application, how to use them to describe the state of each client and how use them to implement remote control and monitoring interfaces using shared state collections. Along the way, you have seen how to use the soundworks wizard within your application (i.e. npx soundworks).
In the next tutorial, we will see how to extend the possibilities of soundworks with plugins. For this first dive into plugins we will use the @soundworks/plugin-platform-init plugin that is meant to simplify some redundant and cumbersome tasks such as resuming the audio context, etc.