Using Plugins 2 - The sync Plugin
In this tutorial, we will dig into a very important problem when dealing with distributed system, and moreover in musical context, i.e. how to synchronize events across the different devices that compose our system.
After a short introduction about why this can be an issue and of the underlying concepts involved in synchronizing devices on a network, we will learn how to use the @soundworks/plugin-sync plugin which is proposed to solve this particular class of problems.
The final source code of this tutorial can be found here
Related documentation
- @soundworks/plugin-sync
- Synchronisation for Distributed Audio Rendering over Heterogeneous Devices, in HTML5
Introduction
First of all let's start with a bit of theory to understand the general concepts and theory behind the sync plugin.
The "Why"
An important thing to understand when working with system composed of multiple devices is that each of them will live into a different timeline. Or to say it in a more formal way:
« An important observation is that, as a consequence of dealing with independent nodes, each one will have its own notion of time. In other words, we cannot assume that there is something like a global clock. This lack of a common reference of time leads to fundamental questions regarding the synchronization and coordination within a distributed system. » Maarten van Steen, and Andrew S. Tanenbaum. “A Brief Introduction to Distributed Systems.” Computing 98, no. 10, October 2016.
Indeed, each device has different physical clocks, each of them having a different time origin and furthermore a different speed. Most of the time, i.e. when we use our computers in our daily life, this is something we don't perceive as users, but only because our computers are constantly synchronizing themselves with reference clocks through the network thanks to the Network Time Protocol (NTP).
We could consider at this point that the problem is solved, i.e. let's use NTP! But unfortunately the problem is a bit more complicated in our context.
First, we cannot always assume that our devices will be connected to the Internet and thus able to connect to a NTP server. Indeed, in many situations, you will have to and/or want to create you own local network, and this, for several reasons: e.g. the venue where your artwork is presented has a poor network installation, you want to have some control over what happen on the network to make sure the bandwidth is properly used, etc.
Second, when you want to produce sounds in a synchronized way, the clocks that are of interest for you are not the system clocks but the audio clocks. Furthermore, we cannot assume that these two clocks, the system and the audio clocks, 1. share the same origin, e.g. the origin of AudioContext.currentTime is defined as when the context is resumed, and 2. that they even advance at the same speed, i.e. this is likely that the system and the sound card don't share the same physical clock.
For all these reason, it is important in our context to have some way of synchronizing arbitrary clocks without relying on external resources such as a NTP server.
The "How"
On a more practical manner, we can thus consider that when trying to synchronize 2 clocks, we face a problem that can be expressed in the following form:
- Tclock1 = a * Tclock2 + b
Where:
- a is the speed difference between the two clocks, i.e. their drift
- b is the origin offset, i.e. the delta time between their respective origin
For the sake of keeping things simple, in this tutorial, we will consider the ideal case where 1. the respective speed of the clocks is exactly the same, i.e. a = 1 and 2. the time of the propagation of a message on the network is constant (disclaimer, none of these assumptions are true in real life...). Hence, the goal will be to estimate b so that we can calculate Tclock1 from Tclock2 and inversely.
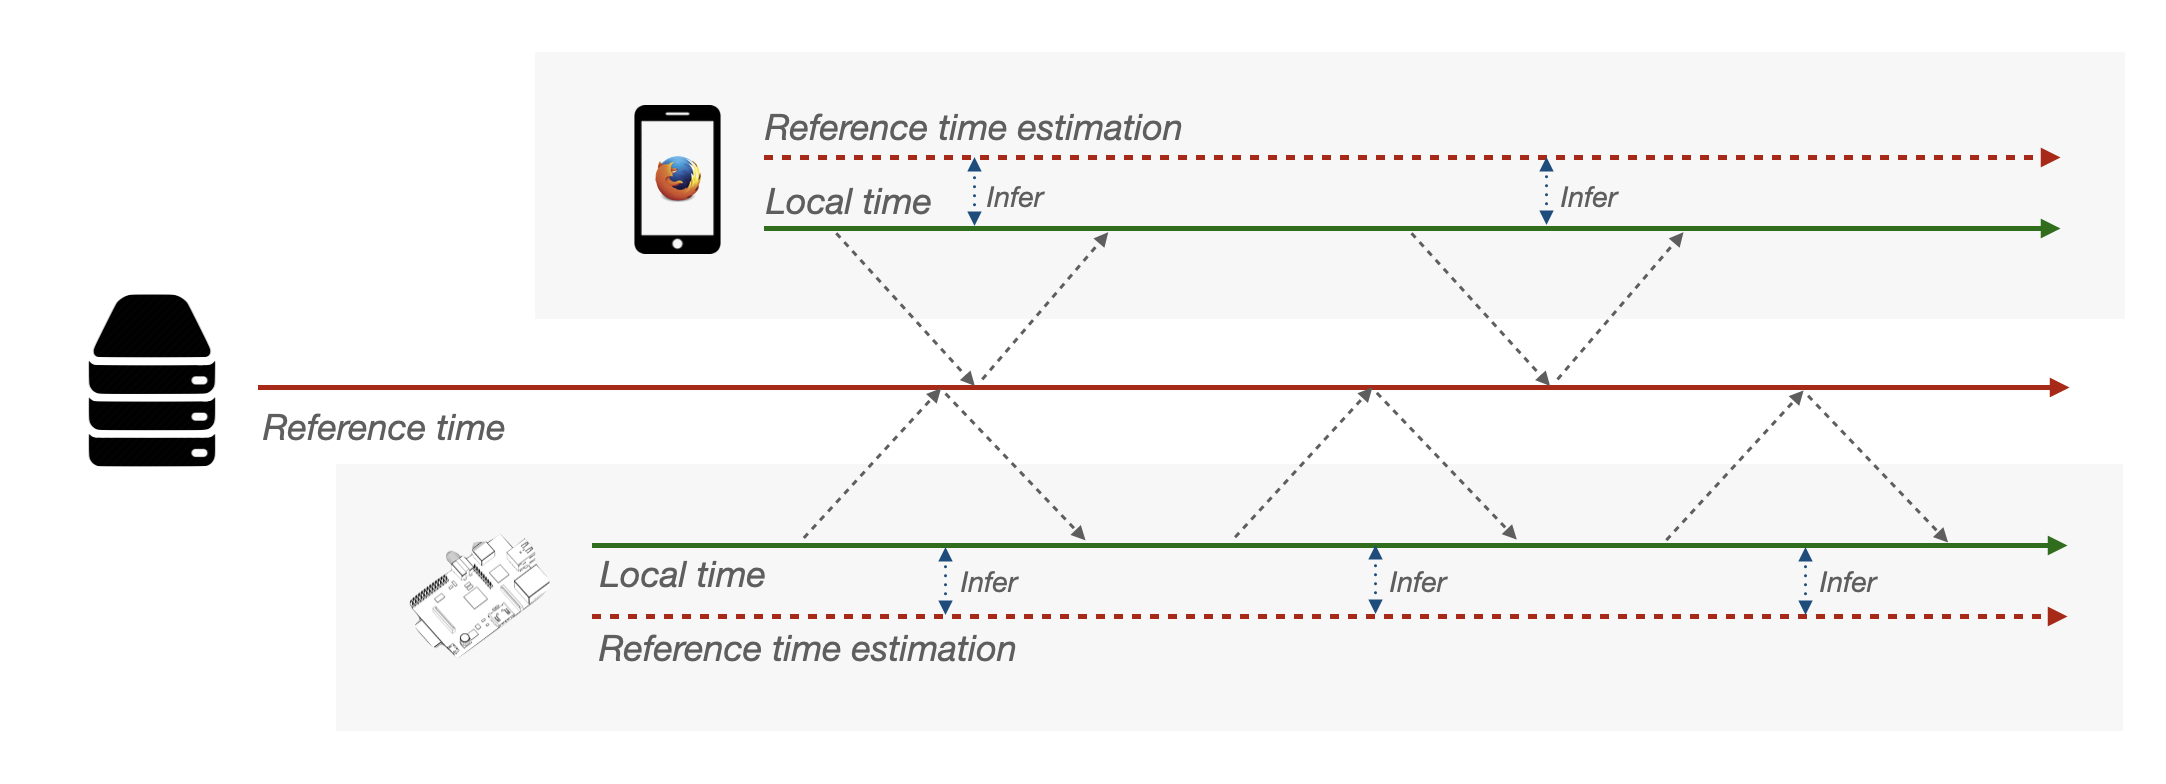
To achieve that, we need a clock that we consider as a reference, in our case the most simple is to use a clock provided by the server as all clients are connected to it. Then, as shown in the figure below, the clients will periodically ask the server for its current time, to calculate the offset of their respective clocks:
More precisely at each iteration:
- The client takes its current time (tping),
- The client sends a message to the server which takes its time tag at message reception (Tping)
- Then, the server sends back a time tagged message to the client (Tpong)
- The client takes its local time (tpong) at reception of the message from the server.
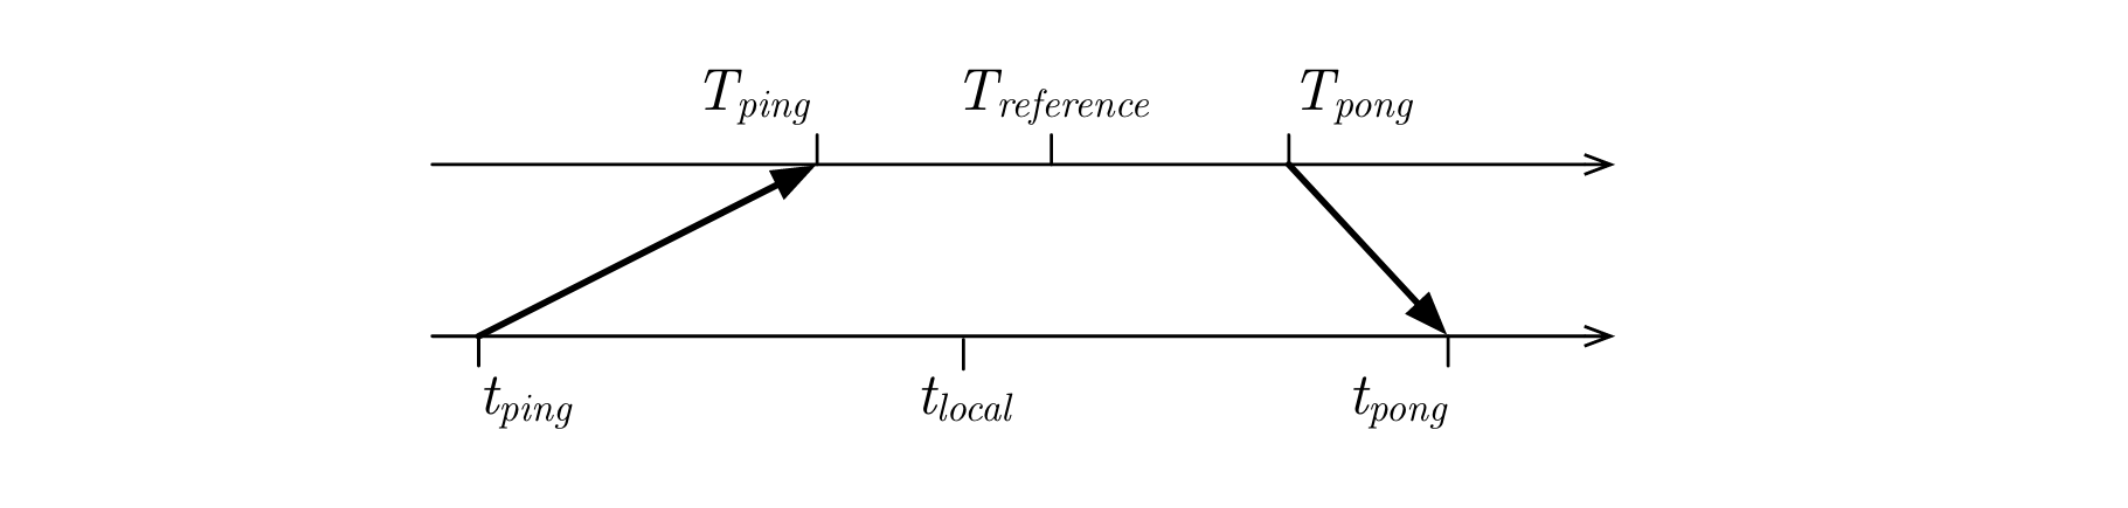
Hence if we assume that the travel duration of the ping and pong messages are equal, we can compute the offset between the 2 clocks as the following:
- Treference = (Tpong - Tping) / 2
- tlocal = (tpong - tping) / 2
- offset = tlocal - Treference
From this point, it is then possible for all clients of our network to calculate a local estimation of the server clock. With such information, it therefore become possible for our clients to schedule audio or musical events in the same inferred time reference, while scheduling the actual audio synthesis in their own local audio time.
While this explanation is indeed simplified, we hope it gives you some intuition on the logic behind the synchronization process between different nodes on a network.
Let's now experiment with the @soundworks/plugin-sync to see how all these ideas translate into code.
Scaffolding the application
First thing first, let's create a new project using the soundworks wizard:
cd /path/to/working/directory
npx @soundworks/create@latest plugin-sync
When the wizard will ask you to select the plugins you would like to install, select the @soundworks/plugin-platform-init and the @soundworks/plugin-sync:
# Install plugins
? Select the plugins you would like to install/uninstall › - Space to select. Return to submit
◉   @soundworks/plugin-platform-init
◉   @soundworks/plugin-sync
◯   @soundworks/plugin-filesystem
◯   @soundworks/plugin-scripting
◯   @soundworks/plugin-checkin
◯   @soundworks/plugin-position
◯   @soundworks/plugin-logger
And the @ircam/sc-components library:
# Install libraries
? Select the libraries you would like to install/uninstall › - Space to select. Return to submit
◉   @ircam/sc-components
◯   @ircam/sc-scheduling
◯   @ircam/sc-utils
◯   node-web-audio-api
Then, when the wizard will ask you for the configuration of the default client:
- Name it
player - Select the
browsertarget - Select the
defaulttemplate
# Create client
✔ Name of your new client (lowercase, no-space): … player
✔ Which runtime for your client? › browser
✔ Which template would you like to use? › default

- Creating client "player" in file "src/clients/player.js"
- name: player
- runtime: browser
- template: default
- default: true

? Confirm? › no / yes
Finally, open the new plugin-sync directory in your favorite editor and launch the application in development mode:
cd plugin-sync
npm run dev
Using the sync plugin
Register the plugin
Now that everything is ready let's start with installing our plugin both on the server and on the client side.
Open the src/server.js file and add the following code:
// src/server.js
import { Server } from '@soundworks/core/server.js';
import { loadConfig, configureHttpRouter } from '@soundworks/helpers/server.js';
import ServerPluginSync from '@soundworks/plugin-sync/server.js';

// ...

const server = new Server(config);
configureHttpRouter(server);
server.pluginManager.register('sync', ServerPluginSync);
Then on the client-side, in the src/clients/player.js:
// src/clients/player.js
import { Client } from '@soundworks/core/client.js';
import { loadConfig, launcher } from '@soundworks/helpers/browser.js';
import ClientPluginSync from '@soundworks/plugin-sync/client.js';
// ...
const client = new Client(config);
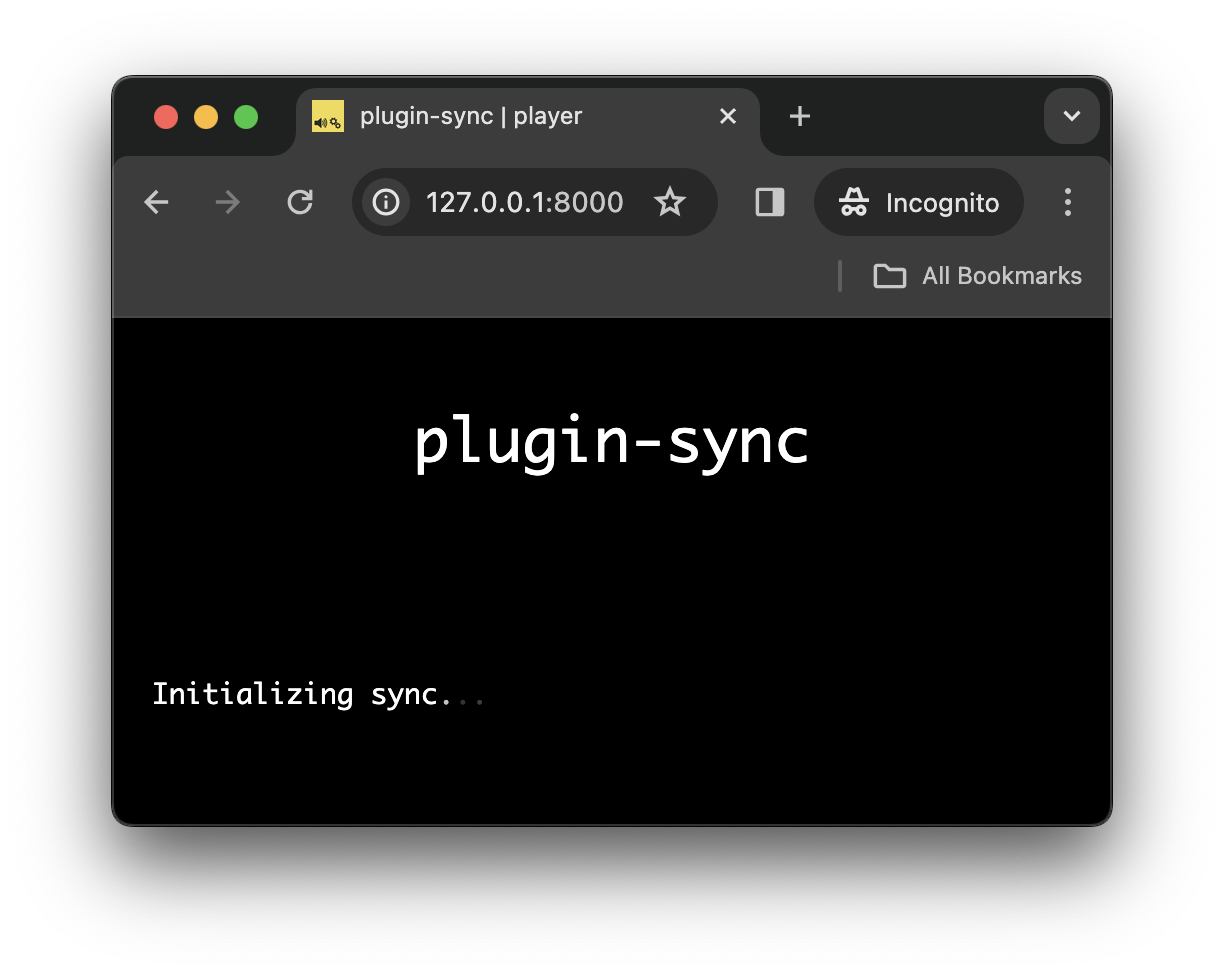
client.pluginManager.register('sync', ClientPluginSync); If you launch a client, i.e. http://127.0.0.1:8000, you should now see a screen telling you that the synchronizing process is on-going at startup:
Finally, let's add a bit of code to display the current reference time as estimated by the client, alongside its local time:
// src/clients/player.js
await client.start();
// retrieve the sync plugin instance
const sync = await client.pluginManager.get('sync');

function renderApp() {
  render(html`
    <div class="simple-layout">
      <p>Hello ${client.config.app.name}!</p> // [!code --]
      <p>localTime: ${sync.getLocalTime()}</p> // [!code ++]
      <p>syncTime: ${sync.getSyncTime()}</p> // [!code ++]

      <sw-credits .infos="${client.config.app}"></sw-credits>
    </div>
  `, $container);

  // refresh the screen at 60 fps
  window.requestAnimationFrame(renderApp);
}

renderApp();
If you now open several browser windows side by side, you should see how the synchronization process allows to estimate a common reference clock (i.e. syncTime) alongside their own local clock (i.e. localTime):

Synchronizing the audio context
So far so good, but what we are interested in is to synchronize the clock of an AudioContext to synchronize our audio events.
By default, the sync plugin uses a default clock which is either Date.now or performance.now depending on the runtime (i.e. browser or Node.js). However, it is indeed possible to configure it to use another clock, such as the one provided by AudioContext.currentTime. Let's see how to implement that.
First, we will to setup the @soundworks/plugin-platform-init plugin which will allow us to resume the AudioContext and thus have a working clock. Indeed, if we used an AudioContext in default suspended state, the current time would always be zero, which would not be very useful for synchronizing...
Let's then add the following code in the src/server.js file:
// src/server.js
import { loadConfig, configureHttpRouter } from '@soundworks/helpers/server.js';
import ServerPluginPlatformInit from '@soundworks/plugin-platform-init/server.js';
import ServerPluginSync from '@soundworks/plugin-sync/server.js';

// ...

server.pluginManager.register('platform-init', ServerPluginPlatformInit);
server.pluginManager.register('sync', ServerPluginSync);
And the following on the client side, to resume our AudioContext when the user clicks on the screen:
// src/clients/player.js
import ClientPluginPlatformInit from '@soundworks/plugin-platform-init/client.js';
import ClientPluginSync from '@soundworks/plugin-sync/client.js';

// ...

const client = new Client(config);
const audioContext = new AudioContext();

client.pluginManager.register('platform-init', ClientPluginPlatformInit, {
  audioContext,
});
client.pluginManager.register('sync', ClientPluginSync);
Finally, let configure further the sync plugin so that it uses the clock provided by the AudioContext and starts the synchronization process only when the audio context is properly resumed:
// src/clients/player.js
client.pluginManager.register('sync', ClientPluginSync);
client.pluginManager.register('sync', ClientPluginSync, {
  // use the audio context clock
  getTimeFunction: () => audioContext.currentTime,
  // declare the 'platform-init' plugin as a dependency, so that the
  // sync process starts only when the audio context is resumed
}, ['platform-init']);
And that's all, we now have a synchronization process estimating the server reference time using the clock provided by our audio context.
Trigger a synchronized audio event
Now that everything is set up, let's just trigger some synchronized sound between all our player clients. The general idea will be that anytime a user clicks on a button, a sound will be played back in a synchronized manner on all clients 0.5 second after the click.
To that end, let's first create a shared state to propagate the synchronized time at which the sound should be played:
// src/server.js
server.stateManager.defineClass('global', {
  triggerTime: {
    type: 'float',
    event: true,
  },
});

await server.start();
// create a global state on which all clients will attach
const _ = await server.stateManager.create('global');
Then in our player clients, let's import a button component and attach to this state:
// src/clients/player.js
import { html, render } from 'lit';
import '@ircam/sc-components/sc-button.js';

// ...

await client.start();
const global = await client.stateManager.attach('global');
Now let's update our interface so that when the user click the button, the global shared state is updated with the current sync time to which we add our offset of 0.5 seconds:
// src/clients/player.js
function renderApp() {
  render(html`
    <div class="simple-layout">
      <p>localTime: ${sync.getLocalTime()}</p>
      <p>syncTime: ${sync.getSyncTime()}</p>

      <sc-button // [!code ++]
        @input=${e => global.set('triggerTime', sync.getSyncTime() + 0.5)}
      >trigger sound</sc-button> // [!code ++]

      <sw-credits .infos="${client.config.app}"></sw-credits>
    </div>
  `, $container);
  // ...
}
Finally, let's react to the update of the global state to trigger a sound at the given synchronized time. The main idea will be to convert the synchronized time into the local audio time to trigger the sound at the right moment.
// src/clients/player.js
const global = await client.stateManager.attach('global');
const sync = await client.pluginManager.get('sync');

global.onUpdate(updates => {
  if ('triggerTime' in updates) {
    // trigger time is in the synchronized timeline
    const syncTime = updates.triggerTime;
    // convert this time to the local audio timeline
    const audioTime = sync.getLocalTime(syncTime);
    // let's now trigger a random frequency at this exact moment
    const frequency = 200 + Math.random() * 400;
    const osc = new OscillatorNode(audioContext, { frequency });
    osc.connect(audioContext.destination);
    osc.start(audioTime);
    osc.stop(audioTime + 0.1);
  }
});
And tada! If you now open several clients at once, e.g. http://127.0.0.1:8000/?emulate=3, and click on a button, you should ear the different oscillators playing all together (with a nice dirty click at the end due to the lack of envelop 😃).
Conclusion
In this tutorial, you have learned the reasons and general concepts behind clock synchronization in a distributed system, and learned how to use the sync plugin provided by soundworks to synchronize audio events.
In the next tutorial, we will go further and use this new tool in a more musical way by implementing a distributed step sequencer.